Friday, March 22, 2013

Easter Crafts: Plastic Cup Easter Bunny


I love crafting with my children. I specialize fifteen minutes a day to craft with my beautiful daughters whom I love dearly. Easter is coming soon, and children would love to make bunnies, chicks and eggs. Easter bunny is adored by kids with all the chocolate eggs he offers so lets learn how to make beautiful kids crafts shaping like bunnies to provide our loved ones with the best time ever. 
This project is easy and very creative and most importantly How to be Super Mom never forgets to choose Easter crafts that are affordable and can be realized by a small number of simple supplies such as card boards, construction papers and plastic cups.

Supplies Needed
  • 2 Plastic cups
  • 2 construction papers, white and pink
  • 3 cotton balls
  • 2 Googly eyes
  • 1 black pipe cleaners
  • Ribbon
  • Glue
  • Scissors
Directions
  • Glue together both tops of the plastic cups.
  • Draw bunny ears, bunny paws shaping like ears and 2 hearts. Make sure that the templates drawn on the pink sheet are slightly smaller than those sketched on the white sheet.
  • Cut the templates out, glue them together following the picture, and glue the bunny parts on the cups.
  • Glue the eyes.
  • Glue the 2 white cotton balls on the bottom of the eyes.
  • Take a small part of the third cotton ball, color it with pink and glue it in the middle top of both glued cotton balls.
  • Divide the black pipe into 6 equal parts.
  • Glue three from each side of the white cotton balls.
  • Glue the ribbon on the top side of the bottom plastic cup.
  • Take two additional parts of the remaining cotton ball, glue them and color them in blue.
  • Your Easter bunny craft is ready and your kids could show it off to their friends and relatives.

How to be Super Mom will keep providing you with free, easy kids crafts. Follow our Blog by registering to our mailing list to keep getting all our free recipes, crafts, tips and super mom guides starting from our free potty training guide and soon to come our complete free pregnancy guide.
Super Moms this Blog is what you all have been waiting for, like us on Facebook and visit us daily for more.

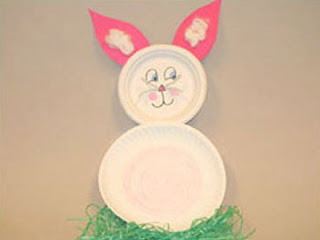


Easter Crafts: Paper Plate Easter Bunny

Easter crafts

Paper plate kids crafts are very easy and extremely affordable. How to be Super Mom suggests you keep all the left over paper plates from events and holidays until you get the chance to make one of our paper plate crafts.
The Easter bunny is one of the most important symbols of Easter Sunday, maybe not as popular as Santa Claus on Christmas but  kids wait for him to bring them chocolate eggs and candies.
This Easter bunny craft will look nice if hung on the fridge or the bedroom's door.
A cute character that your children will love making with you, all you need is paper plates, glue and a marker. Ready? then get your supplies ready and lets get crafting.

Supplies Needed
  • 2 white paper plates, one slightly bigger than the other
  • 1 pink card board
  • A small quantity of cotton
  • Black, pink and blue marker
  • Glue
  • Scissors

Directions
  • Glue the large plate over the small one like seen in the picture.
  • Draw two large bunny ears on the pink card board, cut them out and glue them from the back side of the small paper plate.
  • Glue the cotton in the middle of the bunny ears.
  • Using the markers, drew the eyes, nose and mustaches.

See how easy that was? I know that you all love to craft with your kids but you do search for quick and easy crafts since every super mom is over loaded with house chores, errands, and she still loves to spend quality time with her children. How to be Super Mom has always insisted on the importance of a mother-child time and we will always provide you with the best kids crafts to allow you to get more creative ideas along the way.

Easter is coming soon, so why not concentrate on making your own holiday decoration. Bunnies, chicks and eggs can fill your house for a remarkable low cost. Enjoy super moms and keep following our Blog for more ideas on Easter crafts.


Thursday, March 21, 2013

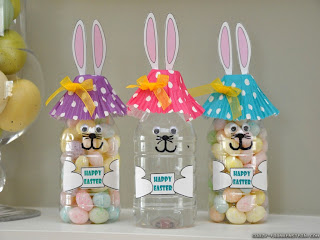
Easter Crafts: Easter Bunny Plastic Candy Jar

Easter crafts

I love holidays so much and Easter is coming soon. I am looking forward to the family gatherings, warm delicious Easter meals and the best of all is the entertainment we have for the kids during those family parties. We play outside, play catch but we also need to improvise something that would make them sit and slow down for a while. Kids crafts are the best solution for your kids to calm down, quit running all around and enjoy themselves by creating something interesting which they will use to decorate their room.
Easter crafts are all about bunnies, chicks and eggs. In this kids craft we have used two fundamental elements: bunnies and Easter eggs.

Supplies Needed
  • 1 empty plastic bottle
  • 1 cupcake liner
  • 1 ribbon
  • 1 A4 white sheet
  • 1 bag of candy or chocolate eggs
  • Knife
  • Scissors
  • Glue 
  • Black marker


Directions
  • Cut the top of the bottle with a knife.
  • Glue the cupcake liner on top of the bottle.
  • Glue the ribbon on the cupcake liner.
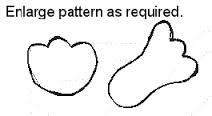
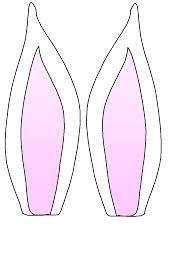
  • Print out the following templates on the A4 sheet, cut them out and glue them in place.
Easter bunny template


Have a terrific Easter super moms and always remember that How to be Super Mom will always provide you with the best tips to make your life easier.

*You can purchase your Easter candies and chocolates from How to be Super Mom.

Party Favor Prepack - Spring Bunnies Party Favor Prepack - Spring Bunnies
These Candy you ate as a kid 10 oz party favors are prepacked with over 20 of the most popular candies. Each bag is about 9 inches high by 5 inches wide and is tied with a colorful bow. A typical candy list is below (additional info tab). Quantity discounts are available.Party Favor Prepacks: more choices >>>Not quite the right candies? Select your own candies, party favor bag and ribbon color on our Upack Party Favor page.Orders placed by midnight usually ship on the next business day.


Easter Chocolates - assorted wrapped piece Easter Chocolates - assorted wrapped piece
These hollow chocolates come in a variety of shapes including bunnies, hens, chicks and eggs. Each piece is made with delicious milk chocolate and makes a great addition to Easter baskets and gift bags. You will receive a random shape. If you order more than one we will mix up the shapes. Each piece is hollow, measures about 2 inches tall or long and weights 0.75 to 1 ounces.Easter Candy: more choices >>> Orders placed by midnight usually ship on the next business day.


Chocolate Eggs in Easter Foil - 2 lb bulk bag Chocolate Eggs in Easter Foil - 2 lb bulk bag
These solid bite sized chocolates have a festive egg shape and are individually wrapped in pastel foil, making them the perfect addition to Easter baskets and gift bags. The egg is 1 inch tall and there are about 160 in a 2 lb bag.Easter Candy: more choices >>> Orders placed by midnight usually ship on the next business day.


Peeps Pink Marshmallow Bunnies box of 12 Peeps Pink Marshmallow Bunnies box of 12
Soft rabbit shaped marshmallows covered in a sweet sugar coating are what you'll find in every package of these festive treats! These marshmallow bunnies are a classic treat during the spring months and Easter holiday.Easter Candy: more choices >>> Orders placed by midnight usually ship on the next business day.

Monday, March 18, 2013

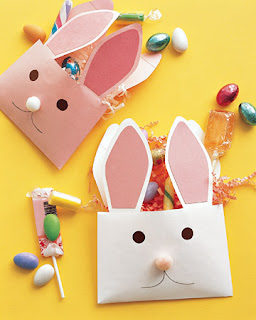
Easter Crafts - Easter Bunny Bags

Easter crafts
Make your own Easter bunny bags following simple steps-
Kids love candy, even though "How to be Super Mom" advice parents to discourage the daily intake of sugary foods but a holiday is sweeter with chocolates and lollipops. If you have the custom to set up an Eater tree then this kids craft is great to be hanged on the tree for decoration. In case you don't like trees, you can prepare these bags to offer them to children visiting your house on Easter Sunday.
Your children will be happy to prepare this Easter craft, and they will be thrilled to offer them to their friends and cousins. Take fifteen minutes out of your busy day and teach your child how to craft this easy bunny face, prepare them from now to be ready when the holiday comes.

Supplied Needed
  • 2xA4 white card boards
  • 1xA4 pink card board
  • 1x A4 black paper sheet
  • 1 white cotton ball
  • Glue
  • Scissors
  • Black marker
  • Ribbon
  • Stapler

Directions
  • Take 3 cm from each side (width wise).
  • Draw a 3x 29.7 cm rectangle from each side, and fold the papers following the line you draw.
  • After folding the edges, fold your paper in half.
  • Glue the edges together to make the bag base.
  • Draw four bunny ears on the white sheet if you decided to make a white kids craft.
  • Cut them out.
  • Draw two smaller bunny earlobes on the pink card board if your ears were white and vice versa.
  • Glue the ear lobes on the front side bunny ears.
  • Glue the ears in place as shown in the picture.
  • Cut out two black circles from the black paper for the eyes or use googly eyes.
  • Glue the cotton ball for the nose, and draw the mouth with a black marker.
  • To hang your bag on a tree, staple a ribbon on both sides of the bunny bag.

Easter crafts are fun if the whole family contributes in the making. Consider inviting your husband to join in, your children will be thrilled and he will learn that spending additional time with his loved ones is a blessing.
How to be Super Mom is posting daily kids crafts that are easy and convenient for all ages, don't forget to join our site, register as a follower and become one of our fans on Facebook.


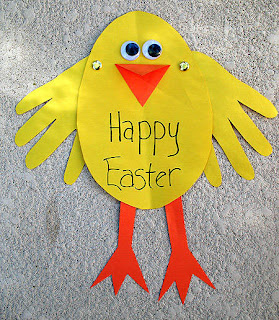
Easter Crafts: Paper Easter Chick

Easter crafts


How to be Super Mom provides a number of Easter crafts to help you spend quality time with your children. This egg chick is a funny and simple kids craft that require 15 minutes to be done. You can either hang it on your children's bedroom door, make 10 more to form a garland that you can decorate your living room with, or decorate your child's note book with it.
A small list of supplies will do the trick. Let's get to work.

Supplies Needed
  • 2x A4 yellow paper
  • 1x A4 orange paper
  • tacks
  • Glue
  • Googly eyes

Directions
  • Draw a large egg for the body.
  • Draw two large wings and hang them using two tacks.
  • Draw 2 long legs like seen in the picutre.
  • Cut out a diamond shape out of the orange paper, fold it in half, glue the top side of the diamond shape as a beak.
  • Glue two googly eyes to make this Easter craft even funnier.

Your kids craft is done and ready to be used for decoration. This is an excellent craft for preschoolers, it will help them master few skills such as using the scissors, drawing and gluing.
Happy Easter Super Mom!

Friday, March 15, 2013

Make Your Own Cards- Mother's Day Cards: Garden of Flowers

mother's day cards


Make your own cards following How to be Super Mom posts.
This is an easy and simple Mother's day card that you can craft with your children.

Supplies Needed
  • 1x A4 white card board
  • 1x A4 red card board
  • Puncher
  • Green wire
  • Yellow wire

Directions
  • Fold your white card in half
  • Draw three flowers
  • Punch the flowers as seen in the picture leaving the end of each petal hanging at the end.
  • Glue the green wires forming a stem
  • Using the yellow wire, form a bud and glue it in the middle of each flower.
  • Glue the red card board from the inside of the white card.
  • Choose a loverly Happy mother's day poem or quote.

Mother's Day is an event that honors mothers all over the world. Its celebration varies from a country to another. We celebrate it on the 21st of March in the MEA, others on the last Sunday of May, and on the second Sunday of May in the United States and many other countries. No matter when you decide to say Thank you mom it is important to say it with love and affection and nothing is better than a mother's day card to announce it to your super mom.


Thursday, March 14, 2013

Make Your Own Cards: Mother's Day Cards- Flower Vase

Mother's day cards
Mother's day is getting closer and we are all busy preparing for that beautiful event. Every mother is a super mom and she deserves all the love and gratitude we can give her. A handmade card is the best way to say "Thank you mom" for all the trouble you have put yourself into since the day I was born.
How to be Super Mom is posting interesting articles offering you all the guidelines you need to make your own cards. Whether it was Mother's day or St. Patrick's day, handmade objects are always most appreciated because of the time you put into creating them to tell someone that you care.
We have always insisted on the importance of including your children in the making of the handmade projects we offer. Crafting helps a child master many skills which can be later developed into more professional qualifications. Allow them to extend their imagination by sharing a craft project with them everyday. Start by preparing this card to say Happy Mother's Day.

Supplies Needed
  • 1x A4 white card board
  • 1x Pink or yellow A4 card board
  • Dark green marker
  • Pink or yellow ribbon
  • 3x small flowers of your choice
  • Glue
  • Scissors
  • 1x Colored envelop of your choice

Directions
  • Divide the white card board into 3 equal rectangles.
  • Make your own card by folding the right rectangle towards the middle, and then the left one.
  • Measure 5 cm from the top of the left fold, and two from the bottom.
  • Draw the diagonal line, and cut.
  • Draw a V shaped vase like seen in the picture.
  • Glue it to form a small vase.
  • Draw three flower stems with leaves.
  • Glue the flowers of your choice at the end of each stem.
  • Glue the ribbon on top of the vase.
  • Write a beautiful poem or a nice quote on the inside.
  • Write Happy Mother's Day on the vase with a white pen.

 This card is very simple and could be considered as kids crafts. Spend quality time with your loved ones and visit How to be Super Mom for daily new ideas.