Friday, December 07, 2012

Christmas Crafts: Wooden Ornaments


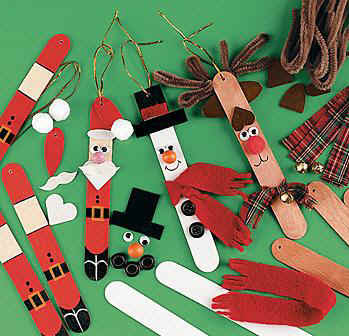
During Christmas, we all love to spend some quality time with our children, help them decorate for Christmas and teach them how to be creative. This project is a very simple yet very original project for the holidays. Your kids could hang those decorated sticks on their tree.


Supplies

Wooden Ice cream Sticks
Paint
Googly eyes
Fabrics for the scarves
Construction paper for the hats
Small Styropan balls for the nose.
Pipe Cleaners
Glue
Scissors
Hole puncher
Ribbons


Directions

Follow the samples on the picture, and get creative. You can draw the lines on the stick, color using the paint, then add some details using the pipe cleaners, fabrics, construction paper and googly eyes. 
Make a hole and insert a ribbon.
Your craft is now ready to be hang on the Christmas tree.


Thursday, December 06, 2012

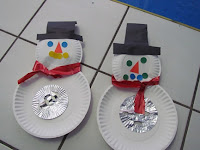
Christmas Crafts: Paper Plate Snowman


You can make this cute snowman from two or three paper plates and decorate it with construction paper.

Supplies

  • Paper Plates
  • Construction Paper
  • Hole puncher
  • Markers
  • Scissors
  • Googly eyes (optional)
  • 3 buttons ( optional)
  • Glue
  • Ribbons

Directions

  • On one of the plates, cut a smaller circle for the head.
  • Punch a hole near the rim of both plates.
  • Tie them up with ribbons or you can simply glue both plates together without punching.
  • Make the hat, scarf and buttons from construction papers or use real buttons, and a small knitted scarf for the snowman.
  • Glue the googly eyes together.

I bet your child will love crafting this snowman.

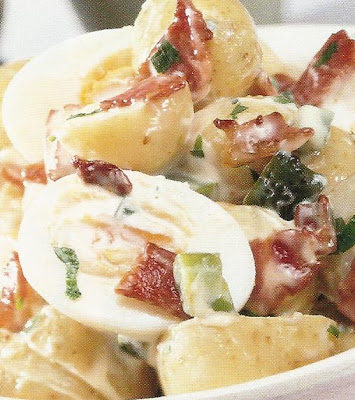
Christmas Recipes: German Potato Salad


Preparation Time: 10 minutes
Cooking Time: 20 minutes

Ingredients

5 eggs, boiled and halved
4 bacon rashers, chopped
1 kg tiny new potatoes, boiled and halved
2 pickled gherkins chopped finely
2 tbsp finely chopped parsley

Lemon Mayo Dressing
1 cup Mayonnaise
1/4 cup lemon juice
Salt and pepper to taste

Directions

Toss all ingredients together and serve hot.
Bon Appétit and always remember to stay open for new recipes!

Christmas Recipes: Beetroot Salad

Beetroot Salad

This is an easy and fresh salad that will make an excellent new dish for Christmas.


Preparation Time: 25 minutes
Cooking Time: 45 minutes

Ingredients

1 kg Beetroot, boiled and cubed.
1 kg potatoes, boiled and cubed.
1 cup fresh peas, boiled
1 small red onion, finely chopped

Lemon Mayo Dressing

1 cup mayo
1/4 cup lemon juice
Salt and pepper to taste

Directions

Toss all ingredients together and serve chilled.

I don't like my meals to be predictable, that is why I do my best to renew the menu on every Christmas. This salad was brought by one of my best friends last Christmas and it was tasty. Hope you will try it.

Friday, November 23, 2012

Spinach and Eggs Salad


Serves 3
Preparation Time: 20 mns

Ingredients

500 g young spinach
1 large red onion, sliced into rings
3 hard-boiled eggs, cut in half
100g pitted, halved black olives
200g chopped fresh mushrooms

Dressing

1/4 cup lemon juice
1/8 cup white vinegar
1/4 cup garlic olive oil
Black Pepper and Salt to taste

Directions

You can either toss all the ingredients together and serve, or start by decorating your serving plate with the young spinach leaves to form a large flower and place the onions, eggs and olives in between the leaves as shown in the picture and the dressing can be served on the side.

Thursday, November 22, 2012

How to be Super Mom- Stuffed Honey Apples

Easy and Quick- Your Stuffed Apples Will be Done in No Time

This easy dessert is very popular at home. I always prepare it when I have guests for dinner, or on our casual family meetings; everyone seems to love these stuffed apples. The taste of dates dipped in honey and nuts is breathtaking.
Amazing how a super mom is always looking to provide her family with the best, and on How to be Super Mom you won't find but the most amazing healthy recipes which your loved ones will fall in love with. Get ready to acquire a larger notebook, your supermom manual will be definitely expanding when you're going to add to it all our delicious recipes.


Stuffed Honey ApplesServes 6
Preparation Time: 15 mns
Cooking Time: 45

Ingredients

6 Green Apples
1 1/2 tbsp chopped roasted nuts
1 1/2 tbsp chopped dates
1/8 cup lemon juice
3 1/2 tbsp light honey
1 tsp cinnamon powder
6 half walnuts

Directions

  • Wash your apples well, and discard them from their seed.
  • Peel the upper half of each apple.
  • Mix all the ingredients in a bowl.
  • Stuff each apple, equally, with the mixture.
  • Cover them with an extra drop of honey, cover and bake for 45 minutes on 180 degrees C.
  • Garnish the top with a half walnut and a sprinkle of crushed nuts.
Enjoy your stuffed apples super moms!

Friday, November 16, 2012

Friday, 16/11/2012

It was one of those days, when you wish the 24 hours could turn into 5 and you can finally go to sleep. My first born has had a mild fever and a cold for 2 days now, the pediatrician asked me to try to protect Sophia, 9 months old, from this virus, so I am trying as much as I can to separate them  in different rooms without making Nour feel as if she was holding a deadly contagious virus :D.

So other than my daily chores, I had to keep them both entertained in different rooms, at the same time, so it was awfully exhausting; running between the two of them all day long I felt as if I was a top spinning around and around.
Thank God that my mother decided to pass by and help me around, she took care of the cooking and took them for separate walks and showered Nour.
So it wasn't that hard to take it alone from noon till now but it was, again, awfully exhausting.

And tomorrow Nour has her ballet class, I have my painting class and at noon we are going to see "T'choupi". Between you and me? today's wish was being one of those ladies who has nothing to do all day and has bunch of people doing every thing for her, taking her kids out, cleaning for her and a chef to cook for her. Dreams are free aren't they? ;)


How Did I Start Knitting?


 How did it all start?

My mom is the knitter in the family; since Nour was born she made her a lot of beautiful sweaters, hats and scarves. But when my first born was almost one year old the Dr. asked mom to stop all kind of crafts that involves thumb movements since she has been diagnosed with a problem in her finger ligaments. 
So I had to start buying Nour sweaters until one day, at Christmas, my aunt offered her a beautiful black and red, short sleeves, dress, and where I live, it is almost impossible to wear short sleeves during December so I went searching for a black cardigan everywhere and I mean it everywhere, but it seems that for kids black is hard to be found and I couldn’t get it red so I asked my mom to teach me how to knit and I had one week left till Christmas.


And this is how it all started, and knitting became my favorite hobby because it is so relaxing and in the same time very productive. I felt very proud every time I finish one of my pieces and I loved when they took a lot of success among friends, family and strangers. 


Then I decided to start my own small business, and it became successful especially new born items such as blankets, sweaters, hats and socks. I am not making a fortune out of it but I made something for myself and that is what’s more important. If you like knitting don’t hesitate trying to sell your items, I know a lot of people who would die for handmade knitted products. 


And if you don’t know how to knit I advise you to begin learning, you can start with a scarf which is the easiest project and end with a beautiful sweater, who knows!

I suggest “Knittingon the net”, it is one of the sites that helped me a lot as well as "PatonsYarns".
Good luck and if you need any help you can always send me your questions and I am ready to answer them.

Now tell me, did you like these pictures I posted? They represent 3% of what I have knitted so far and I have been knitting for only 2 years.

Saturday, November 03, 2012

Nothing Like Ginger For a Healthy Winter

Ginger should be the main ingredient in your kitchen. Reserve a whole cabinet and fill it with this plant given to us right from the Garden of Eden. True, ginger has been known as so for its multiple health benefits.
But before reviewing its benefits, lets learn how to use it.

As a growing up, nothing is better than a green tea and ginger for a morning start.

When your child is down with a cold, give him ginger. But most our children refuse to drink ginger tea, so what to do?

  1. Boil a 50 g fresh whole piece of ginger, peeled, in water. Allow it to cool and mix it with their milk or mix it with fresh orange juice. A child will hardly notice, or not notice at all the presence of the ginger and it will help him a lot.
  2. Add grated ginger to all your soups.

Why is ginger so important?


Cold and Flu Prevention and Treatment Ginger has long been used as a natural treatment for colds and the flu. Many people also find ginger to be helpful in the case of stomach flus or food poisoning, which is not surprising given the positive effects ginger has upon the digestive tract.
Reduces Pain and Inflammation
One study showed that ginger has anti-inflammatory properties and is a powerful natural painkiller.
Heartburn Relief
Ginger has long been used as a natural heartburn remedy. It is most often taken in the form of tea for this purpose.
Menstrual Cramp Relief
In Chinese medicine, ginger tea with brown sugar is used in the treatment of menstrual cramps.
Ovarian Cancer Treatment
Ginger may be powerful weapon in the treatment of ovarian cancer. A study conducted at the University of Michigan Comprehensive Cancer Center found that ginger powder induces cell death in all ovarian cancer cells to which it was applied.
Colon Cancer Prevention
A study at the University of Minnesota found that ginger may slow the growth of colon-rectal cancer cells.
Morning Sickness
A review of several studies has concluded that ginger is just as effective as vitamin B6 in the treatment of morning sickness.
Motion Sickness Remedy
Ginger has been shown to be an effective remedy for the nausea associated with motion sickness


Here is a list of medicinal properties ginger has been known to have throughout history.
  • anti-emetic/anti-nausea
  • anti-clotting agent
  • antispasmodic
  • anti-fungal
  • anti inflammatory
  • antiseptic
  • antibacterial
  • antiviral
  • antitussive
  • analgesic
  • circulatory stimulant
  • carminative
  • expectorant
  • hypo-tensive
  • increases blood flow
  • promotes sweating
  • relaxes peripheral blood vessels
  • Ginger is good for your health and has been said by some to be a plant directly from the Garden of Eden.

Last year, I had no idea of how important ginger is and the result was a while winter of colds, one otitis and one bronchitis. As if my daughter, 4 otitis and one bronchitis. So this year I started out with a whole new diet to boost our immune system and ginger is one of my primary ingredients.

Wednesday, October 31, 2012

5 Crafts You Can Do Using Broken Crayons


Young children often love to color, but since they are still developing their hand-eye coordination they sometimes end up pressing down too hard on their crayons, accidentally breaking them.  Most parents hate to throw the broken pieces away, and instead end up tossing them into a bucket so the kids can still use them.  However, after a while it may seem like your collection of broken crayons is a little bit too big.  When that’s the case, check out these crafts you can do with them.
  1. Marbled crayon shapes- Purchase a silicon ice cube tray at the dollar store or other discount center.  These silicon trays come in a range of shapes, so allow the kids to pick their favorite one.  Once the silicon trays are used for this project you should not use them for ice cubes again.  Have the kids tear off the paper from all of the broken crayons.  The crayons should be broken into 1 inch pieces.  Place the silicon ice cube tray onto a foil lined cookie sheet.  Place the broken bits of crayons into the ice cube tray.  Try not to mix more than 3 colors together in each cube space or the result could end up being a muddy brown mess.  When the tray is full put it into the oven at 300 degrees F for 10 minutes.  If the crayons are not completely melted after 10 minutes, put them back in and check on them every couple of minutes until they’ve melted entirely.  Once melted, remove the sheet from the oven and allow the crayons to cool and harden completely before removing from the ice cube tray.
  2. Fall leaves or flowers- Create crayon shavings using a basic pencil sharpener.  Keep the shavings in cupcake papers to avoid mixing up the colors and creating a mess.  You will need a lot of shavings for this project.  Tear off a sheet of waxed paper about 36 inches long.  Fold it in half.  Open it back up and have the kids put piles of crayon shavings all over the waxed paper.  Keeping the piles the same color will allow them to show through in the final project and not mix together.  Fold the waxed paper back over the shavings.  Top the waxed paper with foil and then iron with a warm iron.  Keep checking until the crayons are completely melted.  Allow the waxed paper to cook for a few minutes and then let the kids cut out leaves and flower shapes to use as window art.
  3. Dressed up pillar candles- Unwrap all of the broken crayons and put them into a clean, tall, thin metal can – eggnog cans work well for this.  Bring a pot full of water to a boil.  Once boiling, remove the pot from the heat and add the can full of crayons to the water to melt them.  Be patient and do not stir as the colors will blend and turn to a muddy color.  In the meantime, lay out some newspaper.  Next, hold onto the wick of a white pillar candle and dip it into the melted crayons.  When you remove it the pillar will be very colorful.  Hold the pillar over the can to allow any excess to drip off, then set it aside on the newspaper until the wax sets while you dip other candles.
  4. Sandy pics- Pick up some sheets of sand paper at the dollar store or use some you have around the house.  Have the kids color pictures on the sandpaper using the broken crayons and tell them to push hard.  Place the finished sandpaper artwork onto foil-lined cookie sheets and place them in the oven at 225 degrees F, allowing the wax to melt into the crevices of the sand paper.  It should only take about 5 minutes so keep an eye on it.
  5. Melted crayon artwork- You will need a blank canvas of any size, some broken crayons still in their papers, some hot glue and an embossing gun.  Hot glue good-sized crayon pieces still in their paper to the canvas.  To get the longest area to melt it’s best to glue them to the top quarter of the canvas.  Once the crayons are hot glued on you can turn on an embossing gun and start melting the crayons.  Stand the canvas up and lean it slightly back so that the melted wax stays on the canvas.  As you work you will figure out how best to hold the gun and how to manipulate the melting wax.  The embossing gun doesn’t get hot enough to melt the hot glue so the crayons do not fall off, they just melt and the colors run down the canvas.  Bright colors work best for this, but any colors you like will work.
The next time your child breaks a crayon, don’t sweat it.  Just toss it in the bucket until you have enough crayons to make a crayon craft.

Thank you Paul for sharing :) 

Saturday, October 27, 2012

Chance to Win a 50$ Handmade Jewelry Set


To participate in this contest: 

  • You have to be a member on our Facebook page 
  • You have to enter the contest form the link posted on our timeline
  • Write your answers clearly in the comment box
  • Leave your full name under your comment and your e-mail address. 
  • Learn that one of the participants will be lucky to win this piece of jewelry.


Contest Questions:


1- What are the cons of a late potty training?

2- Choose one of our 5 to 7 months old homemade baby food recipes and post it.

3-Name the 3 main ingredients of my famous chicken soup.

4- Name one of our seven tips given to new-mothers to sleep well.


Thursday, October 18, 2012

Teach Colors to Your Child

colors
What is more amazing than colors? Can you imagine a world without them? A rainbow is fascinating because it represents the wonder of color creation. Our world wouldn't be the same if it was in black and white, and the first thing that captures our baby's attention is bright colors. So since day one, our loved one is ready to learn more about what he's interested in, so don't neglect his thirst for knowledge. Never say that he is too young or that you don't have enough time to teach him. Believe me that it won't take any more than the usual daily chit chats you have with him.

Babies: 

Babies are small intelligent creatures, their brain is like a sponge ready to absorb every small information but they can't tell you they are learning cause they don't have the ability to express themselves yet. 
A great way to start is to decorate the nursery in bright colors, this will help the development of his brain. Another easy way is to name the color of the toy he is playing with, per example: "would you like to play with your red truck?", "Look at this beautiful blue balloon". When you take him for a walk, help him translate his observation: "This is a big green tree", "Do you want to smell this beautiful red rose?". Even though at that age, your baby might seam totally passive but believe me he is learning a lot.

Toddlers: 

Reading, daily, illustrated books while naming the colors of the pictures will help your child learn his colors.
Place a number of paint tubes in front of him and let him go pick his favorite one. You will notice, later on, that the color he always picks is, truly, his favorite color. Then, name him all the colors of the paint, and with his finger tip let him draw a line with this color. This will amaze your child and help him memorize the colors easily.
Get a colored toy, and let him point the colors to you.


Doing so children will be able to recognize colors and point them to you as early as 15 months old. But even when they grow up, keep discovering colors together by teaching them how to mix primary colors to obtain different tones and grades. Allow them to decorate few things around the house to learn some color coordination.

So as you see it is, really, not so hard to teach our kids about colors and it doesn't recommend a lot of time, we just have to keep on doing what we do everyday with a small additional effort. Good luck super moms!


How To Be Super Mom


Monday, October 08, 2012

Best Chicken Soup Ever


It’s been called nature’s penicillin and is at the top of the list for its curative powers. Hot chicken soup helps clear clogged airways, and the nourishing broth will give you more energy. And when following Maria's recipe, you will guarantee a quick recovery.

In this recipe, I use, mainly, garlic, onion and ginger. Before cooking, you should know why I chose these 3 ingredients to create my delicious chicken soup.

Garlic ranks as one of the most potent remedies of all time. The most important compound that derives from garlic, is Allicin that provides the greatest reputed health benefits.
As well as having antibiotic properties, allicin is an excellent anti-fungal and garlic preparations have been used in folk medicine to treat skin infections such as athlete's foot.
Onions contain a large amount of sulfur and are especially good for the liver.
Sulfur-containing amino acids are found in onions as well and are called methionine and cystine and, among other things, they are very good at detoxifying your body from heavy metals. In fact, they are able to latch on to mercury, cadmium and lead and escort them out of the body.
Vitamin C, also contained in onions, is excellent at detoxifying the body and is effective in removing lead, arsenic and cadmium. So increasing consumption of onions can help the body to get rid of these harmful metals.
Onion is very good for your heart, it will help:
• Boost beneficial HDL cholesterol
• Thin the blood
• Retard blood clotting
• Lower total blood cholesterol
• Lower triglycerides
• Lower blood pressure
Studies reveal that antioxidants in onions can protect you against cancer is by reducing the DNA damage in cells caused by free radicals.
Ginger  have many medicinal properties such as : anti-emetic/anti-nausea, anti-clotting agent, antispasmodic, anti-fungal, anti inflammatory, antiseptic, antibacterial, antiviral, analgesic, circulatory stimulant, expectorant, hypo-tensive, increases blood flow, promotes sweating and relaxes peripheral blood vessels.
Ginger is good for your health and has been said by some to be a plant directly from the Garden of Eden. It is also said that consuming Ginger before taking a plane flight can prevent motion sickness. It can make good tea, or you can use it as a spicy addition to almost any recipe.


Ingredients

500g skinless, boneless chicken breast marinated and chopped into cubes.
1 head garlic, sliced
2 medium onions, roughly chopped
20 g fresh ginger, chopped
3 small carrots, roundly sliced
750 ml hot water
Salt and pepper to taste
1 tbsp Olive Oil
Vegetables of your choice*

Directions

Heat a pot, pour olive oil, add garlic, onions, ginger and carrots.
Stir for few minutes, around 5 mns, or until onions are golden.
Add the chicken, keep stirring for 5 minutes until cooked from the outside.
Add the boiled water, salt and pepper.
Cook, on Low heat, for 1 hour or until chicken is cooked through.
* You can add any vegetable you like since the power of this soup is in its three magic ingredients.
Meanwhile, prepare boiling water that you will add to your

This is my recipe for chicken soup, my kids love it, they even like to drink it in a cup with a straw, can you believe it? It makes wonders during flu time!
Bon Appétit! Keep warm and healthy, and don't forget to Like my Facebook page.
How To Be Super Mom

Promote Your Page Too

Saturday, September 29, 2012

10 Healthy After School Snacks

In order to help you, How to Be Super Mom surfed the web to hunt the best after school snacks' recipes. Enjoy!

1- Cranberry Oat Cereal Bars

~Martha Stewart
Oatmeal, a whole grain offering both insoluble and soluble fiber, is also a source of protein. The protein found in oatmeal is of a higher quality that that found in most other grains.
Lean protein is essential in every meal to reinforce your immunity system.
Check out the recipe.


~Martha Stewart
Peanut-butter and oat are considered two of the top sources of lean protein. Our body needs these protein at every meal to avoid common colds and flus. 
Check out the recipe.


~Martha Stewart
These sweet crunchy treats, made with whole-wheat and oatmeal, make a perfect healthy snack for our loved ones.
Get the recipe.


~Martha Stewart

Fruits are the best source for nutrients. Try this recipe to give the regular fruit salad a fun, new snap.
Get the recipe.


after school snack
~Martha Stewart

This recipe makes a fantastic protein-rich snack.
Get the recipe.


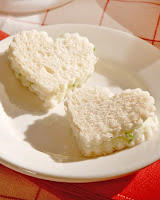
heart shaped sandwiches
Martha Stewart

These fun creative mini-sandwiches make a great healthy snack for your children. Try to use multi-cereal bread instead of white.
Get the recipe.


7- Banana Yogurt Smoothie

Martha Stewart
One banana ( app. 100gcontains) contains 21.5%DV Vitamin B6, 17.1% DV Vitamin C, 16% DV Manganese, 12.2% DV Fiber and 12% DV Potassium.

Yogurt has a lot of benefits, it contains probiotics, will help you prevent osteoporosis, may reduce the risk of high blood pressure, may reduce vaginal infection. If you like you might check the yogurt many benefits here.
Get the recipe.

8- Chicken Kabobs with Peanut Sauce

after school snack

Chicken meat is considered a good source of lean protein. The U.S. Department of Agriculture recommends all adults to get 5.5 oz of lean protein every day as part of a balanced diet. It is also considered one of the foods that will help you boost your immunity system. Lean protein is found in white meat, nuts, quinoa and beans.
Get the recipe.


9- Baked Sweet Potato Fries

These are more delicious than regular fries and much healthier.
Get the recipe.


10- Healthy Oatmeal Snack Cakes

Oat is one of the main sources of lean protein. The U.S. Department of Agriculture recommends all adults to get 5.5 oz of lean protein every day as part of a balanced diet. It is also considered one of the foods that will help you boost your immunity system. Lean protein is found in white meat, nuts, oat and quinoa.
Get the recipe.


How To Be Super Mom

Promote Your Page Too

Tuesday, September 25, 2012

Back To School: Cool Sandwiches and Wrappers

Help your child enjoy school by making him snacks that he will look forward to. 


Decorate the sandwiches by using multi-cereal and white bread. All you need is cookie cutters and a creamy filling such as cream cheese, jam, labneh, peanut butter or anything bread could stick on.
Using the same butterfly cutter, I cut 2 butterflies, a multi-cereal and a white one, and I switched their places to get this cool sandwich. This could be a pleasant way to prepare your kids' lunch!

Now to wrap them, I advise you to get either paper napkins or linen napkins with cool patterns. 

Follow these steps:


See how beautiful your children's school snack will be, I bet that he will be happy to show off his lunch to his friends.
Remember that I am always around to help you so leave me a comment or post on my facebook page.

How To Be Super Mom

Promote Your Page Too

Wednesday, September 19, 2012

Solid Food Recipes from 5 to 7 months

You should give your baby one new food at a time and wait 3 days before you introduce a new one. Meanwhile watch for any allergic reactions like diarrhea, rash or vomiting. If any of these occurs contact your pediatrician. Mainly you should start with leek, potato, sweet potato, green beans, green peas, eggplant, zucchini, onion and parsley; wait till your baby is 6 months old to start with carrots and spinach.
Steam, boil or bake then purée using a grinding machine. You can preserve them in a glass container for 2 days in the fridge and 1 month in the freezer.

Two weeks after you have introduced solids , start mixing vegetables to give him a highest rate of nutrients in a meal; I would like to give you some suggestions.

These recipes will make about 2 portions:

  1. 1 sweet potato, 2 carrots and a handful of green peas.
  2. 200g chopped boiled spinach, 2 carrots and 1 pearl onion.
  3. 4 carrots, a handful of green beans and a slice of potato.
  4. 2 zucchinis and 2 small eggplants.
  5. 1 sweet potato, 1 zucchini and 2 carrots.
  6. 2 cups green beans, 2 carrots and 1 zucchini.
You can mix any of the allowed vegetables to obtain a perfect healthy meal.

Now 3 weeks after mixing, you can start introducing meat and poultry.
1st week: use 30 g per portion of lean meat while cooking for your baby and discard them before grinding the meal.
2nd week: use 30 g per portion of skinless, boneless, chicken breast and discard them before grinding the prepared meal.
3rd week: You can now start grinding meat and poultry with the vegetables. Serve your baby meat for 2 days and poultry for 2 days.

Recipe suggestions:

  1. 200g chopped boiled spinach, a handful of green peas, 2 carrots, 30 g lean meat,1 pearl onion and one small garlic clove (suitable for a 7 months year old baby).
  2. 30 g lean meat, 1 small bouquet of parsley, 1 carrot, 1 medium sweet potato and a handful of green peas.
  3. 30 g lean meat, 5 carrots, a handful of green peas and 2 zucchinis.
  4. 30 g lean meat, 4 zucchinis,  1 pearl onion, 1 small garlic cloves,1 medium carrot.
  5. 30 g chicken, 1 bouquet parsley, 4 cups green beans and  1 slice of potato.
  6. 30 g chicken, 2 small long eggplants, a handful of green peas and 2 zucchinis.
  7. 30 g chicken, 400 g boiled spinach, 1 small garlic clove and 1 sweet potato.
This is a small briefing presented from a mother to you, to help you and encourage you to make your own homemade baby food so you can offer the best for your baby.

You May Also Like:


Best Grinding Equipment
Introducing Solids

The Latest Pediatricians' Recommendations


The Latest Pediatricians' Recommendations About Introducing Solids

My pediatrician informed me during the latest visit, that they held a conference about solid food and they came out with new recommendations that are mainly related to food allergies and acid reflux:

  1. Solid food should be started at 5 months.
  2. Start with a single vegetable purée such as leek, potato, sweet potato, green beans, green peas, eggplant, zucchini, onion, parsley.
  3. Carrots and spinach should be started at 6 months.
  4. Cabbage, cauliflower, broccoli and turnip should not be given until the 8th month.
  5. Tomatoes and celery should not be given before the baby turns 1 year old.
  6. Dried items such as lentils and chickpeas: 18 or 24 months 
  7. 120ml is a fair quantity to serve for your baby.
  8. Start out with 60 ml.
  9. Aromatics herbs are allowed except dried mint.
  10. Give cooked pears and apples at 5 months.
  11. Ten days after giving cooked fruits, start giving raw fruits.
  12. Don't serve any bananas before the 8th month.
  13. Don't give them strawberry, kiwi, exotic fruits, cherries, watermelon, melon and grapes.

You May Also Like:


Best Grinding Equipments
Introducing Solids


Why Choose Homemade Baby Food